User Manual – CompleteUpdated 20 days ago
Orchid Operation Manual
Version 3.1 | May 2025
1. Introduction
1.1 Thank You for Purchasing an Orchid
We sincerely appreciate your support and trust in Orchid. This instrument was designed with passion and innovation, and we hope it becomes an integral part of your creative journey. Whether you’re using it for inspiration, performance, or exploration, we are thrilled to have you as part of our community. Your feedback and engagement help shape the future of Orchid, and we can’t wait to hear what you create. Thank you for being a part of this adventure.
1.2 Overview: What Orchid Is and What It’s For
Orchid is an advanced standalone chord-generating digital synthesizer with onboard effects, dual built-in speakers, and a rechargeable battery.
Its primary feature is its unique, intuitive chord-generating ability, allowing users to create rich harmonic textures with ease. Paired with multiple ways to shape, arrange, and modify chords, it unlocks truly magical creative possibilities.
2. What’s in the Box
2.1 Orchid
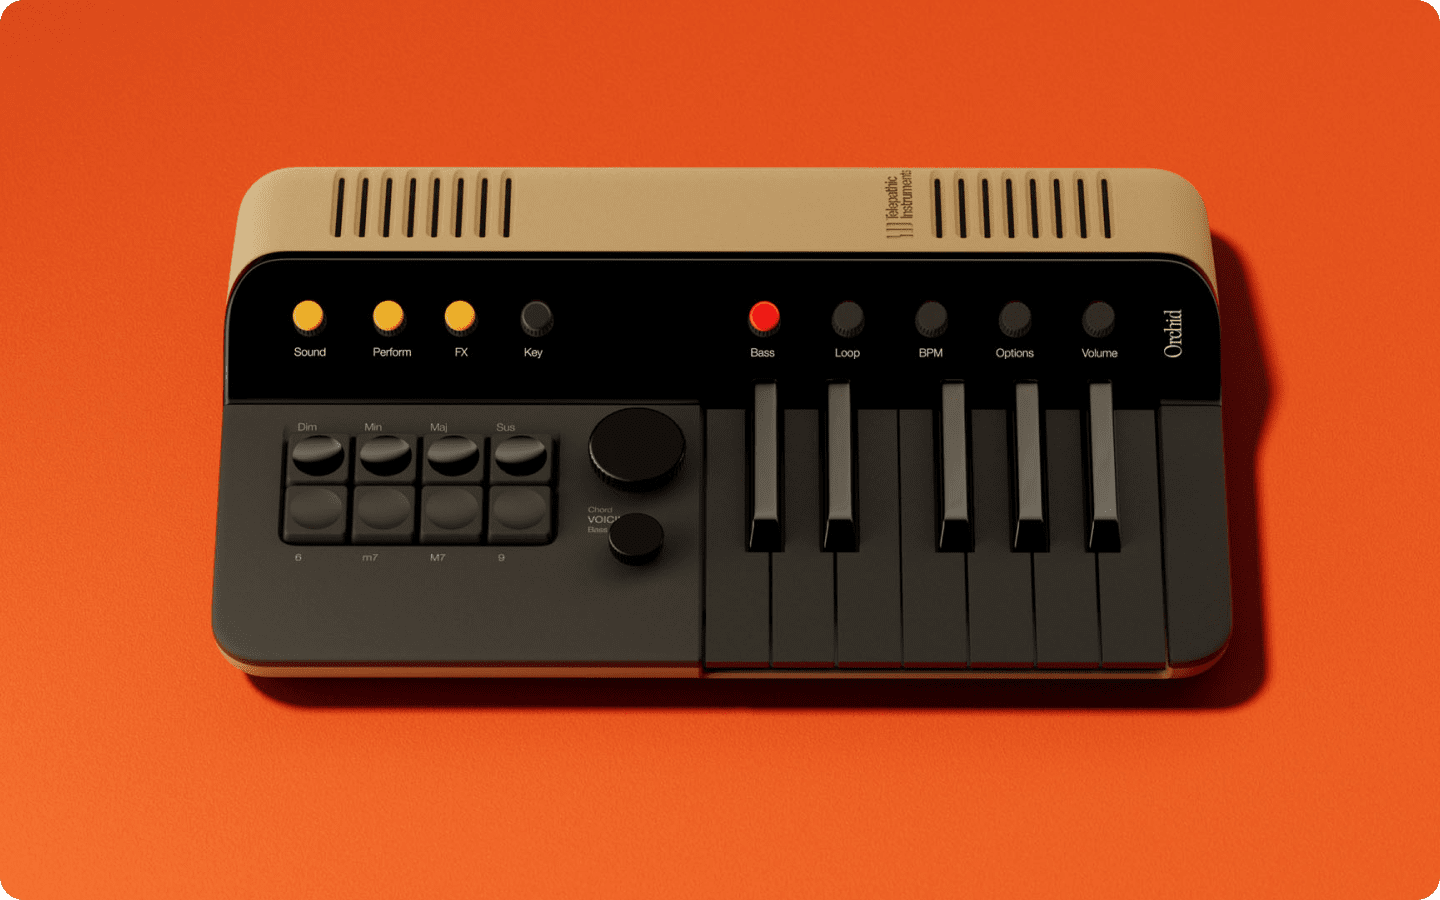
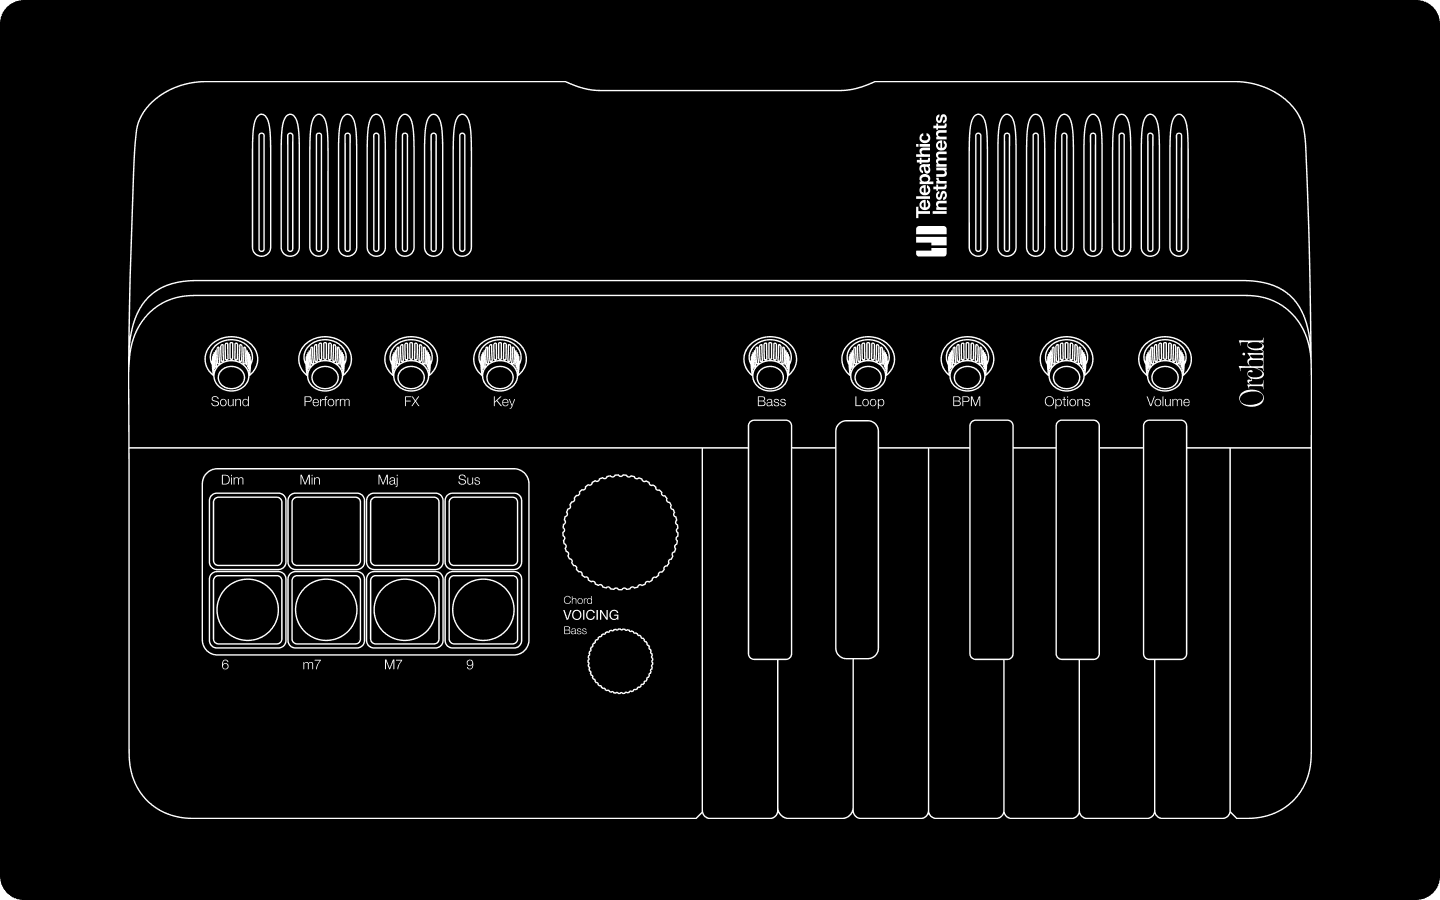
Looking at Orchid, you'll see:
- Two stereo speakers on the top of the case
- Nine endless rotary encoders along the front panel
- An OLED display
- Eight buttons on the left-hand side (four Chord Type buttons on top, four Chord Extension buttons below)
- A single-octave keyboard on the right-hand side
- A Chord Voicing Dial in the middle and a Bass Voicing Dial below it
2.2 Included Accessories
- Quick Start Guide
- Notebook
- No charger (for environmental reasons, use any standard USB-C charger)
3. Connections & Setup
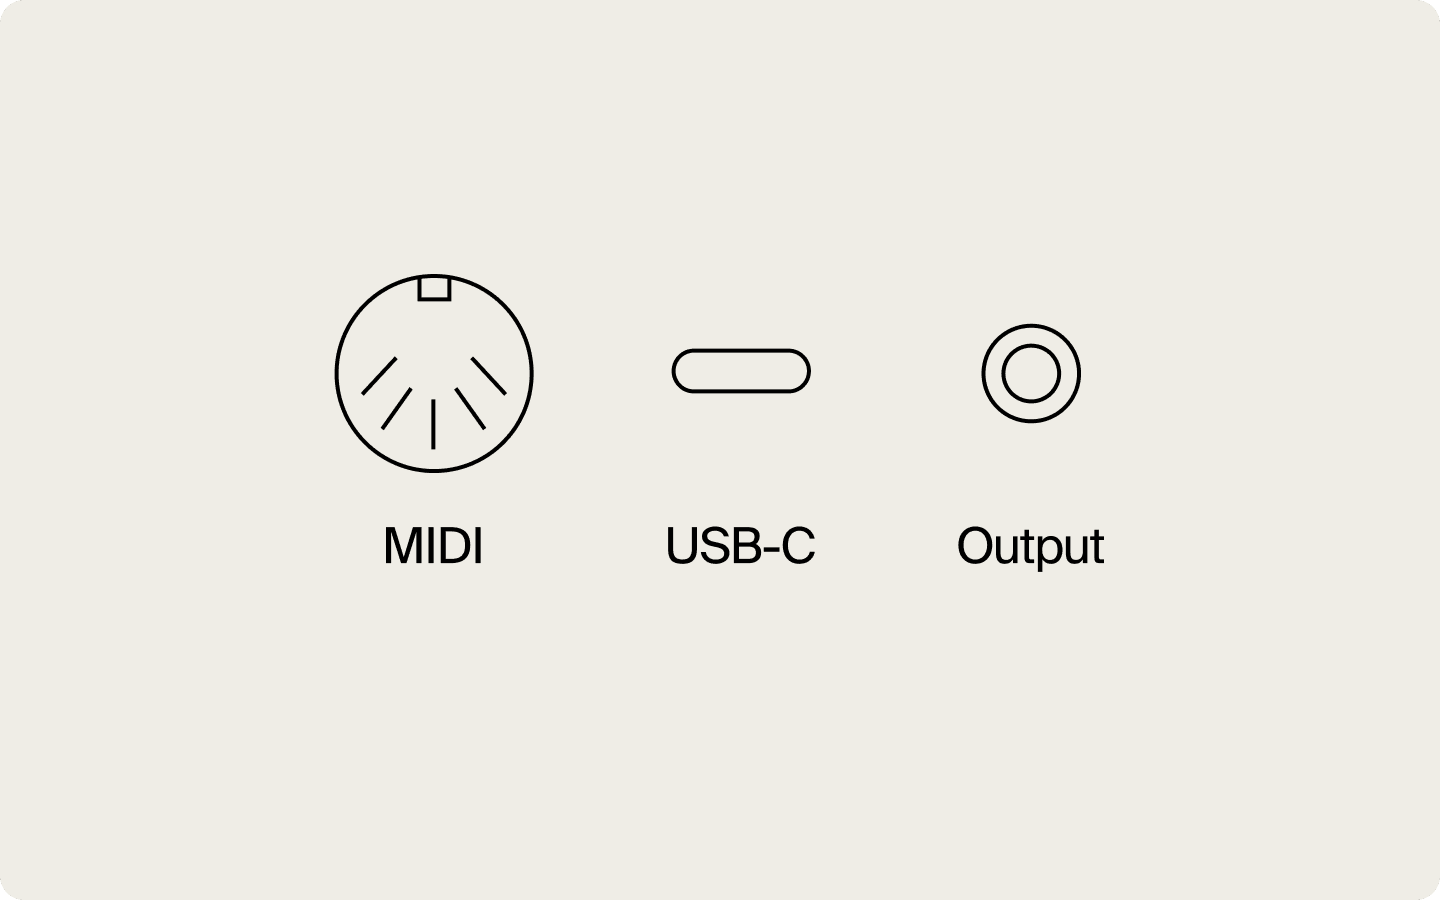
3.1 Audio Output
- 3.5mm Stereo Output Jack: Connect headphones or an aux cable. Orchid’s built-in speakers will automatically disable when this is in use (modifiable in Options).
3.2 MIDI Output
- MIDI 5-Pin Out: Sends chord, bass, and performance notes on separate MIDI channels.
- USB-C MIDI Out: Use Orchid as a MIDI controller for DAWs or external synths.
- Default Channels:
- Channel 1: Chords
- Channel 2: Performance Mode Notes
- Channel 3: Bass Notes
3.3 USB-C: Charging, MIDI & Software Updates
- Charging: Connect any USB-C charger. For maximum efficiency, plug Orchid into a wall socket.
- Note: Orchid does not charge while in USB MIDI mode.
- Software Updates: See Upgrade Firmware in the Options section.
4. Getting Started: Orchid Tour
4.1 Powering On & Boot Sequence
To turn Orchid on, hold the power button for one second. You'll see the logo and a short boot sequence when you turn on Orchid. Then your Orchid is ready to play.
4.2 Adjusting Volume
- Master Volume: Turn the Volume Dial (range 0–99).
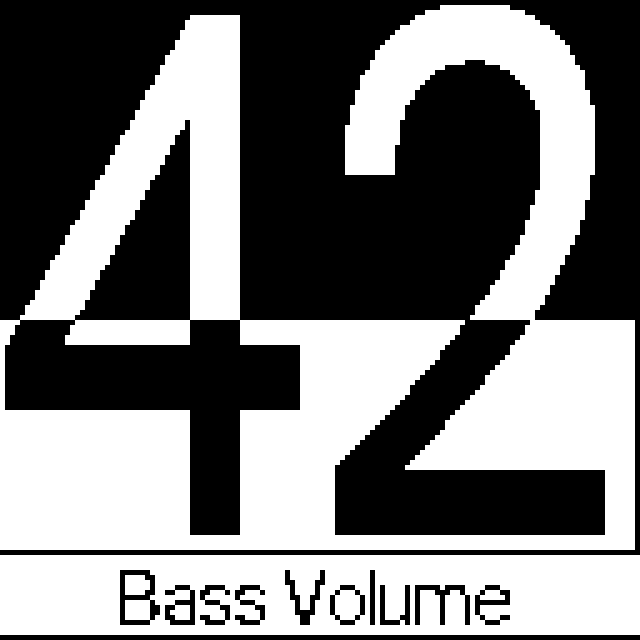
- Bass Volume: Press and turn the Volume Dial to adjust bass volume independently.
- Quick Battery Check: Push the Volume Dial to see the battery percentage.
5. Sound Selection & Chords
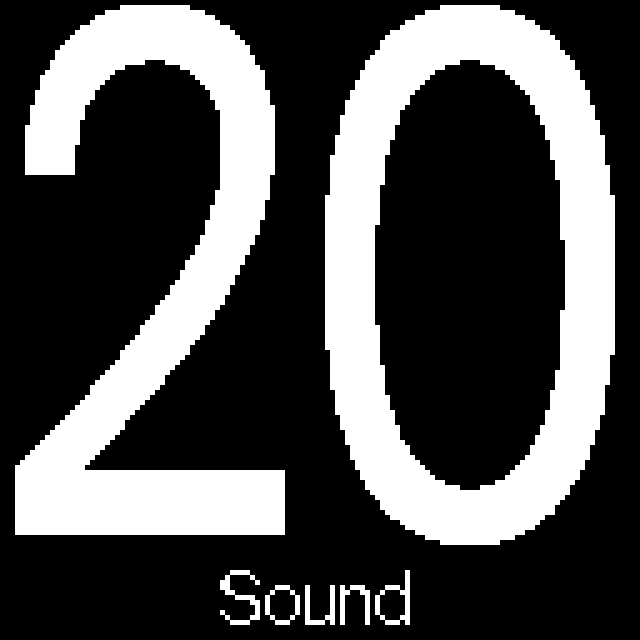
5.1 Sound Selection
Orchid comes with a rich and powerful synthesizer engine, offering sounds that range from natural keyboards to ethereal deep space pads.
- Rotate the Sound Dial to browse through a variety of sound profiles.
- Each sound combines synth textures, effects, and performance settings.
- Experiment with different sounds to find what inspires you.
- Press and turn the Sound Dial to quickly move to a particular sound without scrolling through all the other sounds.
5.2 Playing Chords
With Orchid, making chords has never been easier!
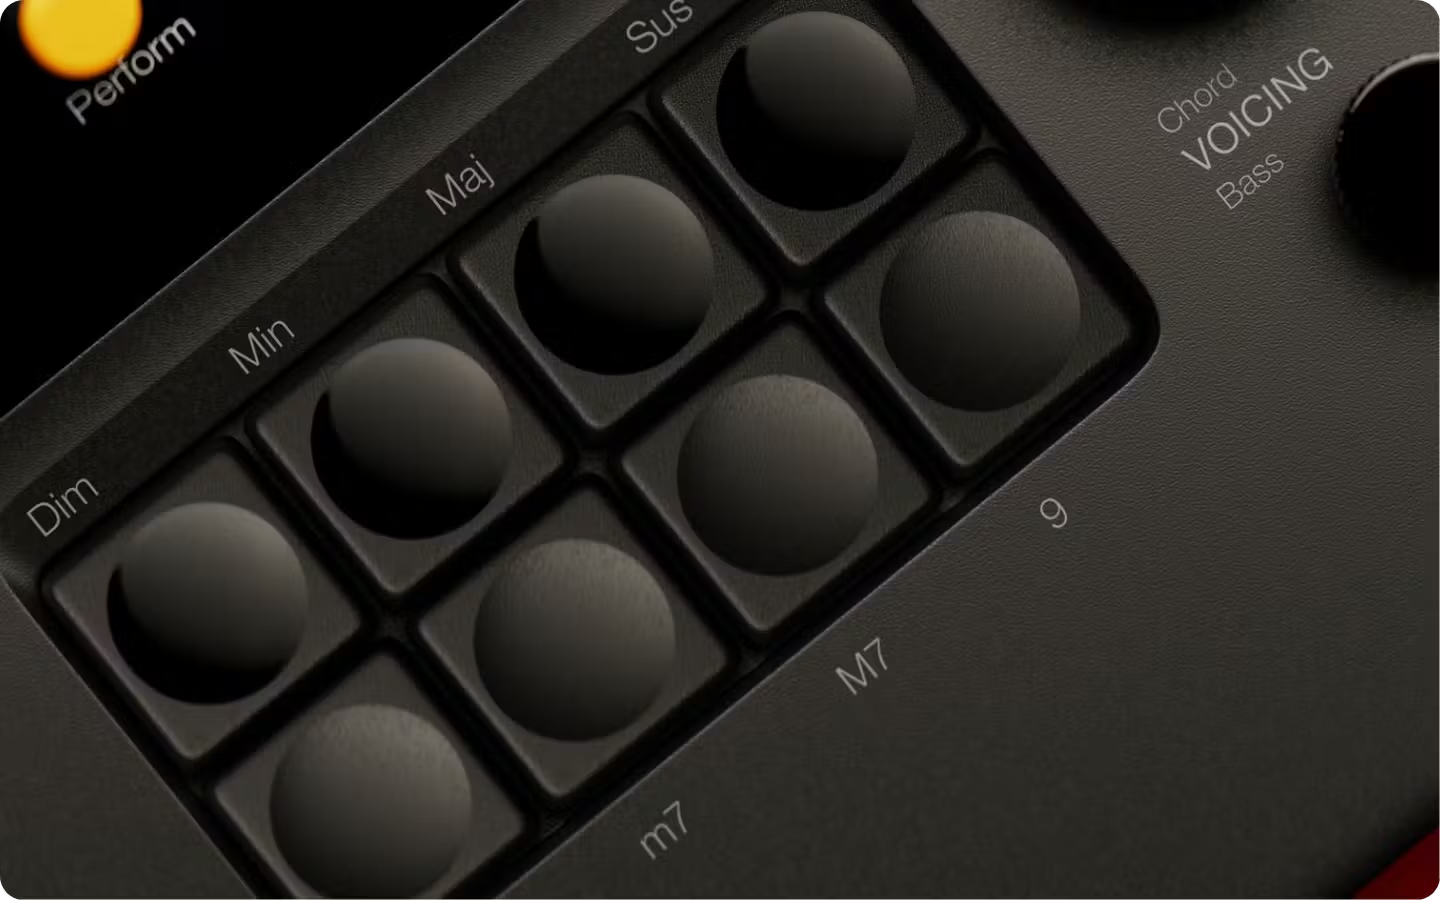
Manual Chord Selection:
- Hold down a Chord Type button with your left hand (e.g., Dim, Min, Maj, Sus).
- Press a note on the Keyboard with your right hand to play the corresponding chord.
Adding Complexity:
- Hold a Chord Extension button, along with a Chord Type button, before pressing a note on the Keyboard.
- Example: Hold Maj and M7 buttons, then press C to play a CMaj7 chord.
- Each Chord Extension adds new layers to the base chord, expanding harmonic possibilities.
- Try adding multiple extensions at once for complex chord voicings.
5.3 Chord Mood Swings
Each Chord Type represents a different mood, influencing the harmonic character of the music:
- Maj (Major) – Bright, happy, resolved.
- Min (Minor) – Dark, melancholic, introspective.
- Sus (Suspended) – Unstable, open-ended, leading to resolution.
- Dim (Diminished) – Tense, dramatic, and unsettling.
Think of Chord Types as the main course and Chord Extensions as the seasoning that enhances the harmonic flavor.
5.4 Common Chord Combinations
Here’s a few common combinations to get you started.
- Major 7th (Maj7)
- Hold [Maj] + [M7] Buttons
- Feels jazzy or fancy. Turns a happy Major chord into something with more class and style. It adds a slightly mysterious feel, without the darkness of a Minor chord.
- Minor 7th (min7)
- Hold [Min] + [m7] Buttons
- Softens the melancholic nature of the Minor chord, adding emotional depth and a soulful character.
- Minor Major 7th (minM7)
- Hold [Min] + [M7] Buttons
- Haunting and intense. It blends the darkness of a Minor chord with the brightness of a Major, creating a striking contrast.
- Dominant 7th Suspended 4 (Sus4-7)
- Hold [Sus] + [m7] Buttons
- Highly dissonant. It creates tension that demands resolution. (Consider choosing a better Sus variation.)
- Diminished 7th (Dim7)
- Hold [Dim] + [m7] Buttons
- Packed with tension, creating an anxious, unresolved sound. Great for generating unease while remaining in key.
- Dominant 7th ([Note]7)
- Hold [Maj] + [m7] Buttons
- Has a strong pull towards resolution. It leans towards being resolved by the root chord of the key which is always 7 semi-tones down (or 5 up) on the keyboard (e.g., G7 resolves to CMaj). This creates a powerful transition where tension builds and then releases.
Tip: There are two approaches to finding the perfect chord with extensions:
- The additive approach: Start with a simple chord type and gradually add extensions one by one to build complexity.
- The subtractive approach: Begin with all four Chord Extension buttons active (creating maximum complexity) and gradually remove them one by one. Listen carefully as you subtract each extension - can you identify which one is holding you back from the sound you're seeking? Just like a sculptor chisels away at stone, sometimes starting with more and refining through subtraction can provide just the perspective you need to discover the perfect chord.
Both approaches offer different creative pathways to chord exploration, and switching between them can help overcome creative blocks.
5.5 Chord Voicing
The Chord Voicing Dial allows you to adjust the harmonic structure of the chord by rearranging the note order.
Voicings work by taking the lowest note currently being played in the chord and moving it up an octave to the top, and vice versa. This creates different inversions of the same chord while maintaining its harmonic function.
- Turning up moves the lowest note up an octave.
- Turning down moves the highest note down an octave.
Tip: Experiment with chord voicing to make your progressions more interesting and avoid static-sounding harmonic movement.
6. Orchid Chord Language
There are lots of different ways to talk about chords:
| Chord Type | Notation Examples |
|---|---|
Major | C, CM, Cmaj, CMaj |
Minor | Cmi, Cm, C- |
Major 7th | Cmaj7, CΔ7, CM7 |
Minor 7th | Cm7, Cmi7, C-7 |
Dominant 7th | C7, Cdom7 |
Diminished | Cdim, Co |
Half-Diminished | Cø, Cm7♭5 |
Augmented | C+, Caug |
The diversity in notation usually reflects genre conventions:
Jazz prefers shorthand and compact symbols to minimize clutter.
- Example: C- (minor), Cmaj7 or CΔ7 (major seventh), Cø (half-diminished).
- Pros: Compact and widely recognized in jazz contexts, allowing quick reading.
- Cons: Can be confusing for those unfamiliar with jazz-specific symbols (e.g., Δ for major seventh).
Classical theory offers precision but often at the expense of being verbose and impractical. Like it’s been written by hand. In the 17th century.
- Example: C minor, C minor 7th.
- Pros: Precise and clear, ideal for teaching and formal scores.
- Cons: Verbose, not practical for real-time performance or software interfaces.
Digital music platforms and Digital Audio Workstations (DAW) balance simplicity and readability for ease of use.
- Example: C, Cm, C7, CM7,
- Pros: Balances simplicity and readability, accessible for users across skill levels.
- Cons: Lacks the extreme shorthand used in jazz but supports cross-genre accessibility.
6.1 Chord Notation: Orchid Standard Framework
The Orchid Standard Chord Naming Framework is our first attempt to provide a clear and consistent system for chord notation. This framework focuses on simplicity and ease of use, and so draws more heavily on Jazz notation with a DAW-ish approach.
Our goals are:
- Ease of Use: An intuitive naming system for musicians of all levels.
- Compatibility: Seamlessly integrates with DAWs and composition software.
- Scalability: Future modular modes ensure adaptability for advanced users.
- The Right Amount of Nerd: Which is to say some amount of nerd.
- Efficiency: Needs to fit onto a tiny-ass screen.
6.2 Triads (Top Keys)
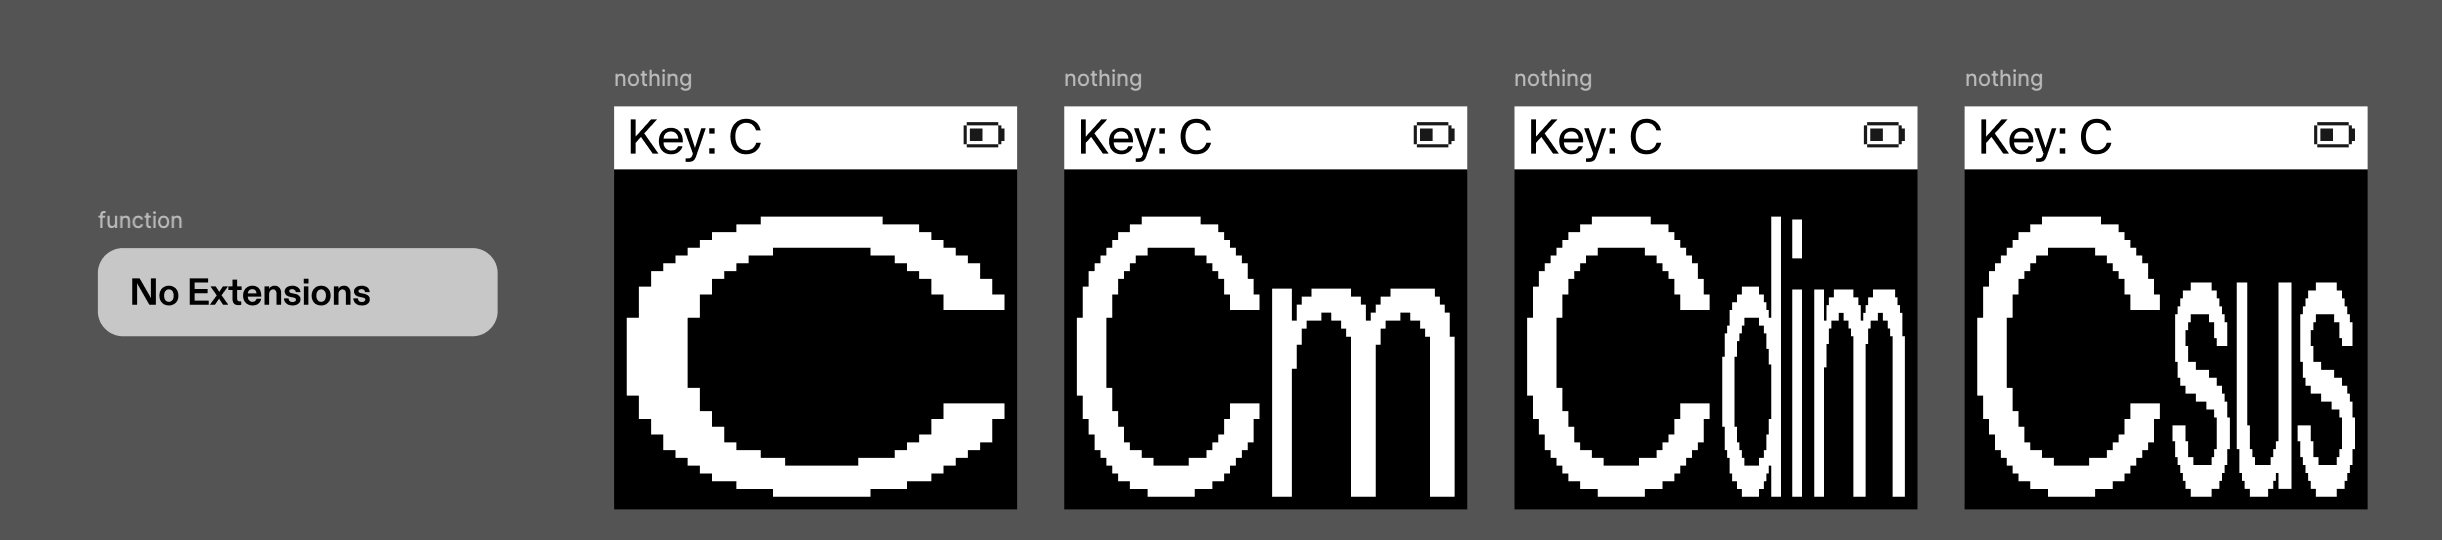
The top keys show what type of chord we’re dealing with, and are in the same size font as the root note of the chord (e.g. Cm). To keep things sleek, all chords (and keys) should default to Major.
6.3 Orchid Standard Framework: No Ext
| Chord Type | Extension | EG |
|---|---|---|
Major | None | C |
Minor | None | Cm |
Suspended | None | Csus |
Diminished | None | Cdim |
6.4 Extension Rules
Extensions are handled as superscripts. To keep things simple (and because of the way Orchid’s voicing engine works) we don’t do fancy stuff like turn a “6” into a “13”. What you play is what you get. And to keep things simpler still, anything that gets too busy (i.e. too many extensions) will turn into a JAZZ ??? chord. (If you want to see what those notes are, you can turn on Geek Out mode.)
The only real anomaly to this rule is the Major chord with a minor 7th (dominant), which is very typically just written as C⁷.

- One Extension:
- Extension is in superscript, e.g., Cᴹ⁷ (C Major 7th).
- Two Extensions:
- Combine both in superscript, e.g., Cᴹ⁷⁹ (C Major 7th + 9th).
- Three Extensions ("JAZZ"):
- Use JAZZ when there are three extensions, e.g., Cmᴶᴬᶻᶻ.
- Four Extensions ("???"):
- Use ??? for four extensions, e.g., Cdim???.
- Five or More Extensions ("WTF?"):
- Use WTF? for five or more extensions, e.g., CWTF?
6.5 Orchid Standard Framework: Extensions
| Top Keys | Bottom Keys | EG |
|---|---|---|
Major | None | C |
| 6th | C⁶ | |
| Major 7th | Cᴹ⁷ | |
| Minor 7th | C⁷ | |
| 9th | C⁹ | |
| Major 7th, 9th | Cᴹ⁷⁹ | |
| Major 7th, 6th | Cᴹ⁷⁶ | |
Minor | None | Cm |
| 6th | Cm⁶ | |
| Minor 7th | Cm⁷ | |
| Major 7th | Cmᴹ⁷ | |
| 9th | Cm⁹ | |
| Minor 7th, 6th | Cm⁷⁶ | |
| Minor 7th, 9th | Cm⁷⁹ | |
| Major 7th, Minor 7th, 9th | Cmᴶᴬᶻᶻ | |
Suspended | None | Csus |
| 6th | Csus⁶ | |
| Minor 7th | Csusᵐ⁷ | |
| Major 7th | Csusᴹ⁷ | |
| 9th | Csus⁹ | |
| Minor 7th, 6th | Csusᵐ⁷⁶ | |
| Major 7th, 9th | Csusᴹ⁷⁹ | |
| 6th, Minor 7th, 9th | Csusᴶᴬᶻᶻ | |
Diminished | None | Cdim |
| 6th | Cdim⁶ | |
| Minor 7th | Cdim⁷ | |
| 9th | Cdim⁹ | |
| 6th, Minor 7th, 9th | Cdimᴶᴬᶻᶻ | |
| Major 7th, 9th, Minor 7th, 6th | Cdimᵂᵀᶠ | |
| ??? | 6th, Minor 7th, 9th, Major 7th, dim, Major | C??? |
7. Performance Modes
Now we've learned to play simple and complex chords, let's animate them using Orchid's feature-rich Performance Modes.
7.1 Accessing Performance Modes
- Press the Performance Dial to see the available modes.
- Turn the Performance Dial to scroll through the modes.
- Press the Performance Dial to select a mode.
- Turn the dial again to adjust the selected mode.
- Hold down the Performance Button to lock the Performance Mode in place, allowing you to switch through different sounds while maintaining your chosen performance settings.
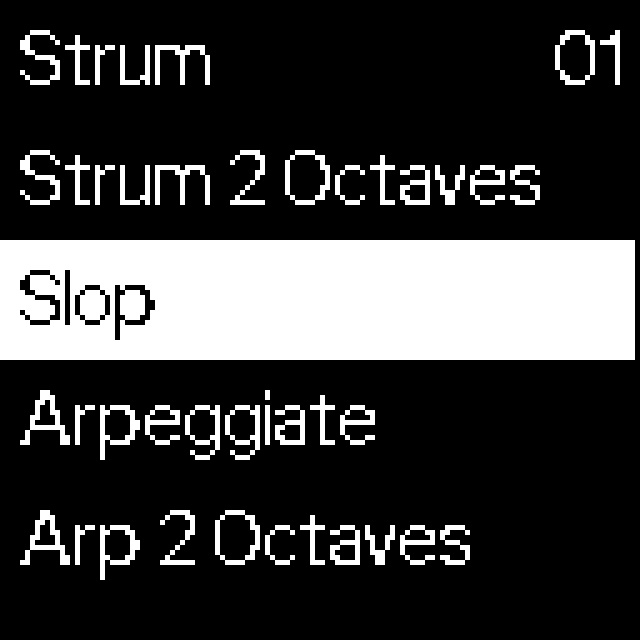
7.2 Available Performance Modes
Strum
- Mimics guitar strumming by staggering chord notes from low to high.
- Adjust the speed using the Performance Dial.
- Creates a natural, flowing effect similar to stringed instruments.
Strum 2 Octaves
- Similar to Strum but extends the range to two octaves for a wider, more dramatic effect.
Slop
- Similar to Strum, but with timing imperfections for a more human feel.
- Adjust the level of Slop to introduce randomness in note timing for a natural, humanized sound.
Arpeggiator
- Breaks chords into sequences of notes played in order.
- Plays the notes of your chord in a repeated sequence selected by turning the Performance Dial.
- Every note in the chord will be voiced; a DMaj will voice 3 notes (D, F#, A), while a DMaj7 will voice 4 (D, F#, A, C#).
- The more notes/extensions you select, the longer the arpeggiator sequence will be.
Arpeggiator 2 Octaves
- Extends the arpeggiator range across two octaves for more dramatic patterns.
Pattern
- Plays chord notes in pre-determined rhythmic patterns.
- Unlike the Arpeggiator, Pattern mode plays notes in sequences that Orchid has selected for you.
- Keeps notes in time with the music tempo, even if the number of notes in the chord changes.
Harp
- Plays the succession of notes in the chord up many octaves fast, like a harp.
- Creates sweeping, expansive passages ideal for dramatic moments.
All timing-based performance modes sync with the BPM, allowing you to speed up or slow down the sequence as needed.
Tip: Experiment by combining different Performance Modes with Effects for truly unique soundscapes!
8. Effects & Sound Processing
Now that we have chords and movement, we can add a final layer of depth by sculpting the effects. Orchid has a range of built-in sound effects designed to enhance and shape your sound. These effects allow you to create anything from subtle warmth to dramatic soundscapes.
8.1 Available Effects
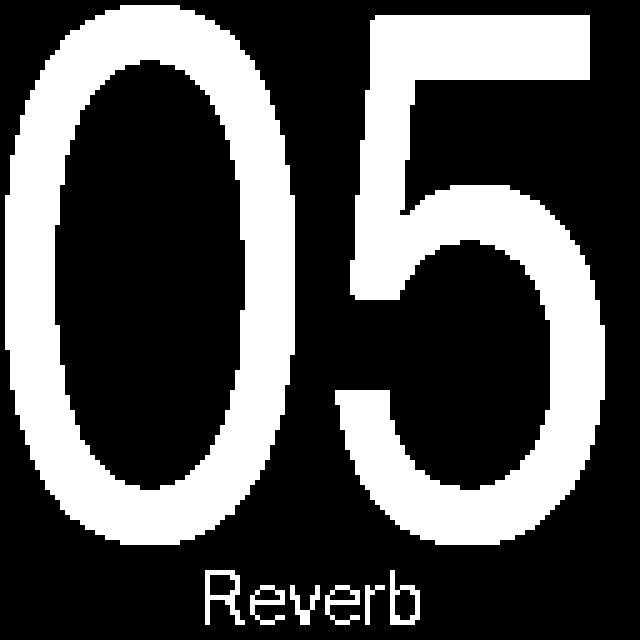
- Reverb: Simulates the lushness of sending your notes into a large space. Whether you want your keyboard to sound like it's being played in a cathedral or a small room, Reverb adds depth and spatial character to your sound.
- Delay: Creates repetitions of everything you play while gently fading the resulting copies away (commonly called echo). Adjust delay time and feedback for rhythmic complexity.
- Chorus: Duplicates the sound and slightly detunes the copies. This brings more depth and fullness, making a single note feel like it's being played by multiple instruments.
- Phaser: Produces a classic swirling effect, shifting frequencies dynamically to create a sweeping, psychedelic tone. Often associated with the 70s rock and electronic music scene.
- Flanger: Takes a duplicate of the signal and moves it closer and further away (in time) to the original, creating a distinct, artificial-like flavor that sounds metallic or jet-engine-like.
- Drive: Adds subtle warmth or aggressive distortion, giving the sound more character and grit. Perfect for thickening tones and making them stand out.
- Tremolo: Modulates the volume up and down in a rhythmic pattern, creating a pulsating effect that can range from subtle movement to dramatic amplitude shifts.
- Ensemble: Expands on the Chorus effect by introducing multiple layers of detuned voices, mimicking the sound of a string ensemble or multi-voice synth.
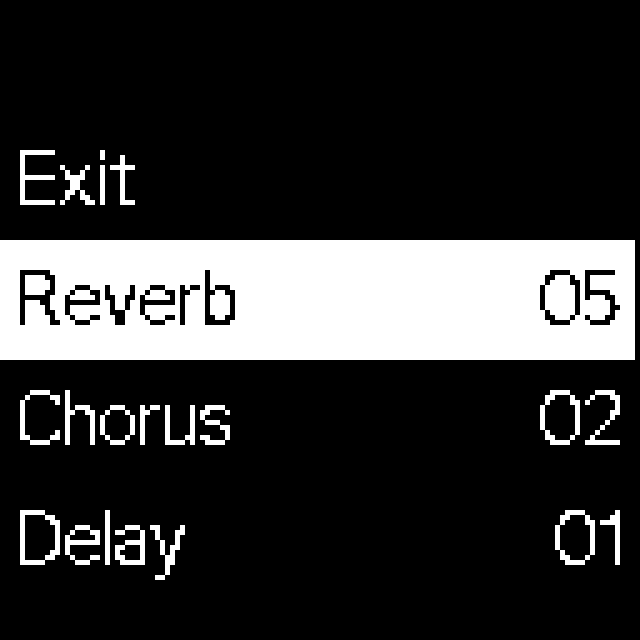
8.2 Adjusting Effects
Each programmed sound in Orchid has a combination of FX stored within it. By default, the FX Dial will automatically increase and decrease the most prominent effect of the currently selected sound.
To customize the effects:
- Push the FX Dial to see the available effects.
- Turn the FX Dial to choose the effect you wish to change.
- Push the FX Dial to select the effect.
- Turn the dial to adjust the selected effect's intensity.
- Long-press the FX Dial to lock the current FX settings.
8.3 Locking FX Settings
Locking the settings means the Effects will stay locked in place as you explore new sounds with the Sound Dial. This ensures that even when you change Sound, your effect settings remain unchanged, maintaining consistency in your sound design.
9. Key Mode & Transposition
Key Mode locks in fixed chords for each keyboard note based on the selected key, providing an intuitive way to stay within a musical scale while allowing for creative possibilities.
9.1 Accessing Key Mode
- Turn the Key Dial to browse through available keys, including sharps and flats.
- Push the Key Dial once to lock in your selected key.
- Push the Key Dial again to turn off Key Mode.
9.2 Key Mode Functionality
When turned on, Key Mode automatically generates chords based on the selected key.
- Example: If you select C Major and lock it in, the right-hand keyboard will trigger chords using only notes from the C Major scale (all white keys in the case of C Major).
- Ensures that all played notes remain harmonically correct, eliminating the need to manually select chord voicings.
- You can override key mode temporarily by playing chords as usual using the Chord Buttons.

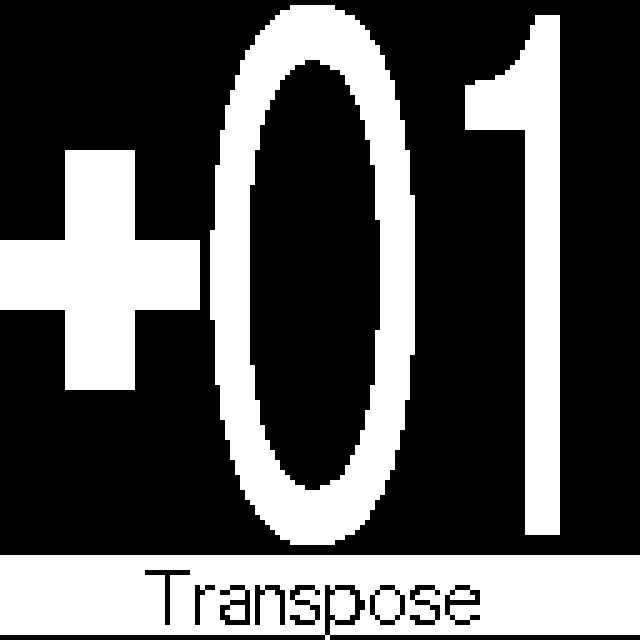
9.3 Transposition
- Press and turn the Key Dial to transpose the entire output of Orchid by a semi-tone at a time.
- This is useful for adjusting the output to match vocalists or other musicians.
9.4 Visual Indications
- When Key Mode is active, the selected key will be displayed in the top-left corner of the screen.
- When Transposition is active, the transposition amount is shown in the top-right corner.

Tip: In Key Mode, each note you play triggers a chord using only notes that fit within the selected key. Thanks to harmonic quantization, any out-of-scale notes are automatically adjusted, ensuring seamless harmonic consistency.
10. Bass Sound & Voicing
Adding bass to your chords can create depth and richness in your sound. Orchid has a dedicated bass synth engine that operates independently of the main synth engine.
10.1 Activating Bass Mode
- Press the Bass Dial to toggle Bass Mode on/off.
- When active, Bass Mode adds the root note of the chord through a dedicated bass synth engine.
- Turn the Bass Dial to browse and select different bass sounds.
10.2 Adjusting Bass Behavior
By holding down the Bass Dial for one second, you can access a menu to adjust the bass mode behavior:
- Chords Only – Bass notes play only when chords are played.
- Unison Bass – Bass notes match exactly what is played on the keyboard.
- Single Notes – A single bass note plays per chord, regardless of complexity.
- Solo – The bass plays independently without other elements.
10.3 Bass Voicing
Similar to Chord Voicing, the Bass Voicing Dial allows you to modify the way bass notes are played:
- Moving the voicing down results in lower, deeper bass notes.
- Moving the voicing up shifts the bass notes higher in pitch.
10.4 Adjusting Bass Volume
- The Bass Volume is adjusted separately from the main volume.
- Hold the Volume Dial while turning it to adjust bass volume independently.
11. BPM Control & Timing Features
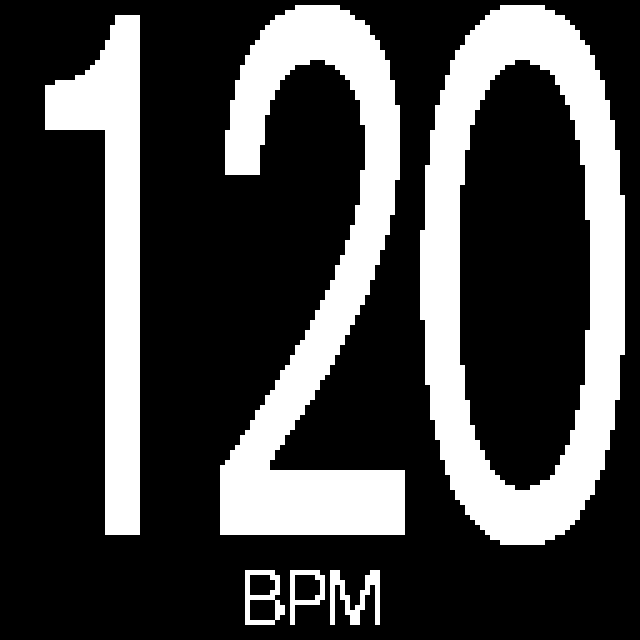
Several features in Orchid rely on a master BPM setting to control the overall pace of time-based effects and performance modes. The BPM Dial serves as the global tempo control, ensuring everything stays in sync.
11.1 Adjusting BPM
- Turn the BPM Dial to set the tempo (beats per minute).
- The current BPM value is displayed on the screen for precise control.
11.2 Using the Metronome
- Push the BPM Dial once to turn the metronome on/off.
- Press and turn the BPM Dial to adjust the metronome volume.
11.3 Synchronization & Timing
The BPM Dial ensures that all time-based features stay aligned:
- Performance Modes – Arpeggiator, Pattern, and Loop Mode sync to BPM.
- Delay Effect – Repeats will follow the BPM setting for rhythmic accuracy.
- Loop Recording – If a tempo-based loop length is selected, it will automatically align to BPM.
Tip: Crank up the BPM until the Arpeggiator blurs together. By creatively manipulating time, you can discover unique and unexpected sonic textures!
12. Loop Mode & Layering
Effortlessly create and layer musical phrases in real time. Whether you're laying down chords, melodies, or rhythms, Loop Mode helps you capture your ideas and build upon them step by step.
12.1 Entering Loop Mode
- Push or turn the Loop Dial to access the Loop Mode Waiting Room.
- Choose your preferred looping method from the available options.
12.2 Loop Mode Options
The Loop Dial functions differently depending on your current stage of looping:
- Turn the Loop Dial to select your Sync Mode:
- Free Mode – Record without tempo restraints, continuing until manually stopped.
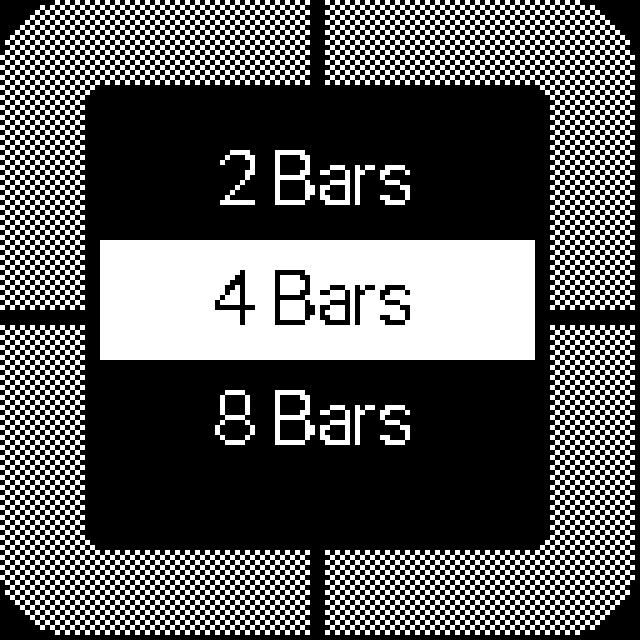
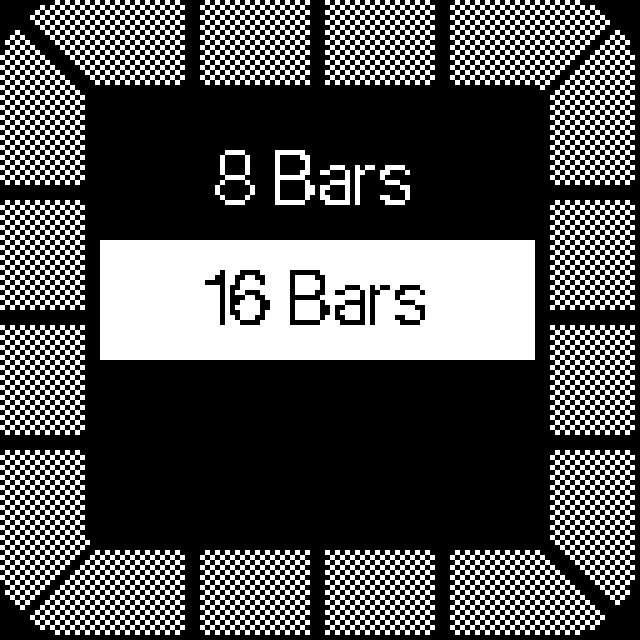
- BPM Mode – Choose from 1 bar, 2 bars, 4 bars, 8 bars, or 16 bars of recording at the current BPM.
12.3 Recording a Loop
- Press the Loop Dial to start recording once you have selected your Sync Mode.
- In BPM mode, a 1-bar count-in will play via the metronome before recording starts.
- In Free mode, recording starts as soon as you play the first note.
- The display shows "Rec" to indicate active recording.
- A Ring Progress Indicator on the screen provides a visual representation of the recording length.
12.4 Playback & Loop Control
- Press the Loop Dial on Stop to stop recording in Free Mode.
- Wait for the fixed loop to finish to stop recording in BPM Mode.
- While the loop is playing back:
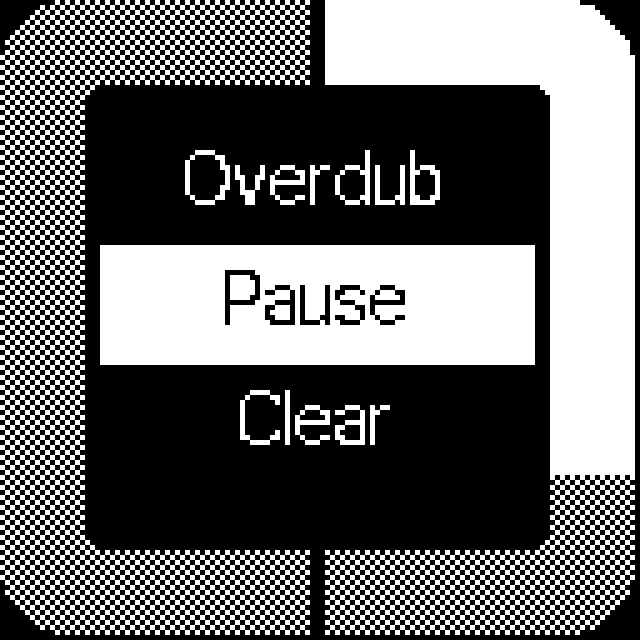
- Single press to pause playback.
- Single press while paused to resume playback.
- Select Clear to clear the loop and return to the Loop Mode Waiting Room.
- Select Overdub to continue recording a new layer.
12.5 Overdubbing & Undoing Layers
Overdubbing allows you to add layers to your existing loop.
- New notes will be recorded on top of the loop.
- Press the Loop Dial on Stop to finish overdubbing.
- If needed, undo the last overdub by selecting Undo from the menu.
- If you undo all overdubs back to the original recording, the Undo option changes to Clear, which will erase the loop completely.
12.6 Metronome & Visual Indicators
- The Metronome can be toggled on/off by pressing the BPM Dial.
- Adjust the Metronome Volume by pressing and turning the BPM Dial.
- The Ring Progress Indicator around the edge of the display shows your current position in the loop, making it easier to time new recordings.
Tip: Want more flexibility when building chords? Use Loop Mode in Overdub to record one note of the chord at a time. Each loop pass allows you to layer a new note, letting you experiment with complex chord voicings. If the latest note isn't right, simply undo the action and try again. This method gives you precise control over your chord stacking and timing, especially when adjusting with the BPM Dial.
13. Options Menu
The Options Menu contains a variety of settings that change how Orchid operates, as well as system information. To access these options, use the Options Dial.
13.1 Battery
- Displays the current battery level.
- At 10% battery, a warning notification appears.
- At a critical level, Orchid will automatically shut down.
- Plug into a wall charger to charge Orchid most efficiently in this state.
- The LED next to the Volume Dial will flash when battery is low, increasing in speed as the charge depletes.
13.2 View
Select different View Modes to customize the display:
- React: Displays an oscilloscope for a real-time visual representation of the waveform.
- Chord: Displays only the current chord being played in large text.
- Keyboard: Shows a visual keyboard with highlighted notes being played.
- Chord & Keyboard: Displays both the keyboard and the chord name.
- Notes: Displays the chord name and the individual notes being played in written format.
- Geek Out: Displays maximum information, including the keyboard, chord name, and notes.
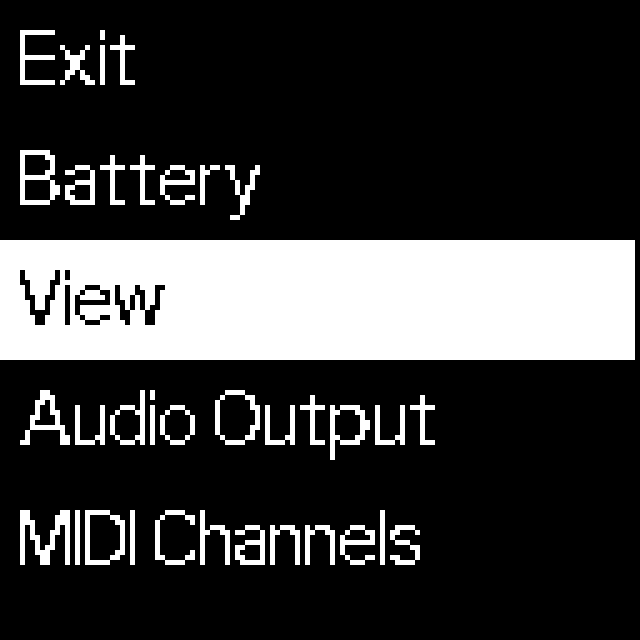
13.3 Audio Output
Customize how audio is routed when an external device is connected:
- Auto – Automatically detects and adjusts audio output.
- Headphones – Outputs only through the headphone jack, disabling speakers.
- Speakers – Outputs only through built-in speakers, muting the headphone output.
- Both – Plays sound through both speakers and headphone output simultaneously.
13.4 MIDI Channels
Determine what MIDI channel Orchid sends MIDI note data on:
- Performance – Outputs notes based on Performance Modes (e.g., Arpeggiator, Strum).
- Bass – Sends bass notes separately on an independent MIDI channel.
- Chord – Outputs played chords, even if a Performance Mode is active.
All three channels can be used at once, allowing for separate recording in a DAW or triggering multiple instruments.
13.5 Playstyle
Adjust Orchid’s playstyle to match your preferred way of interacting with the instrument:
- Simple – Simplified controls for quick and intuitive play.
- Advanced – Provides more control and customization.
- Free – Full creative freedom with minimal restrictions.
13.6 Single Note Mode
- Split Keyboard – Allows splitting the keyboard into different playable zones.
- Full Octave Keyboard – Keeps the keyboard as a full playable octave.
13.7 Metronome Click
- Select different Metronome Sounds to match your preference.
13.8 Velocity Sense
- Toggle Velocity ON/OFF.
- When ON, note volume and intensity will respond to playing dynamics (how hard the key is pressed) for some sounds.
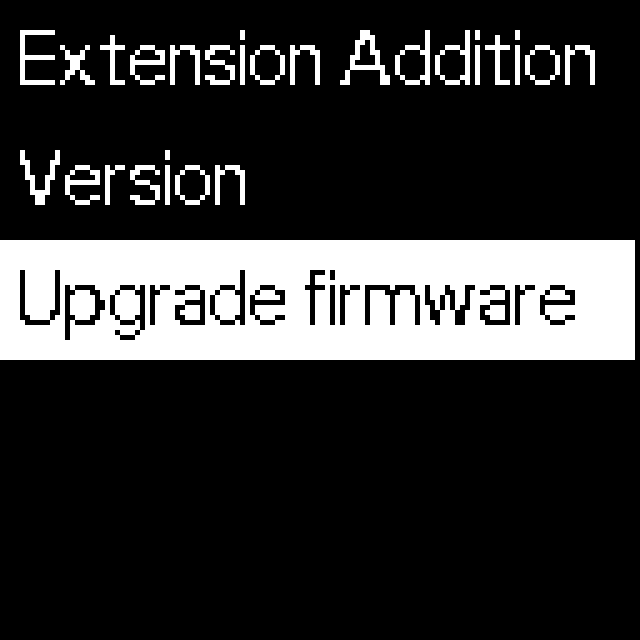
13.9 Extension Addition
Controls how Chord Extensions behave when added:
- Add Just the New Notes – Adds only the additional extension without retriggering the full chord.
- Retrigger Entire Chord – Replays the full chord when extensions are added.
13.10 Quantization
Note: Quantisation will be availble in the next update.
Enables automatic rhythmic correction for Loop Mode recordings:
- None – No quantization.
- Fractions – Choose from 1/4, 1/8, 1/12, 1/16, 1/24, or 1/32 to snap notes to the nearest subdivision.
13.11 Version
- Displays the current firmware version running on Orchid.
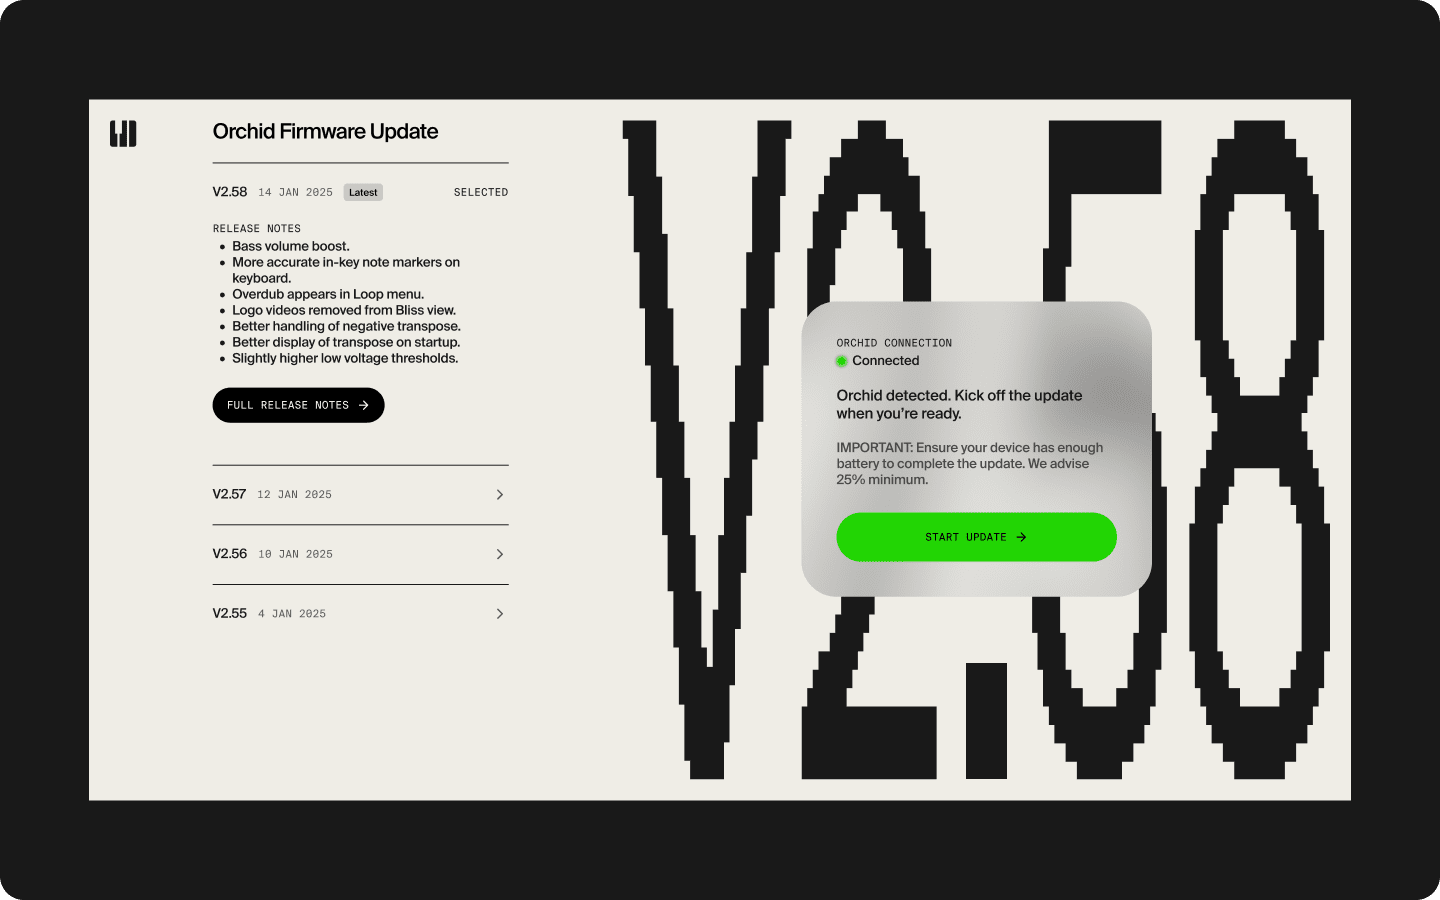
13.12 Upgrade Firmware
To update Orchid’s firmware:
- Select Upgrade Firmware in the Options Menu.
- A QR Code will appear—scan it to visit the Orchid Firmware Update website.
- Or visit https://firmware.telepathicinstruments.com/ in your browser.
- Connect Orchid to a computer via USB-C.
- If prompted, allow WebMIDI to access your Orchid.
- The website will automatically detect the Orchid and display current firmware details.
- If an update is available, the "Update Orchid" button will become active.
- Click Update Orchid to begin the process.
- Keep the browser tab open during the update to avoid interruptions.
Important:
- If performing a bootloader update, DO NOT INTERRUPT the process, as it may cause boot issues.
- If you encounter problems, contact Orchid Support for assistance.
Tip: Keep an eye out for future View Mode enhancements in upcoming firmware updates!
14. Synth Engine
The Orchid Synth Engine is a rich and powerful sound generator, comprising three distinct synthesis methods. These three synth engines have been carefully designed to provide a broad range of sonic possibilities, from warm, analogue-like tones to digital textures with intricate harmonic content.
14.1 Synth Architecture
Orchid is powered by three distinct synthesizers:
- Polyphonic Virtual Analog Subtractive Synth – Modelled after classic analogue synthesizers, featuring warm oscillators and rich filters.
- FM Synthesizer – Capable of producing complex harmonic textures and evolving soundscapes.
- Vintage Reed Piano Emulation – Modelled after a legendary 60s electric piano, including mechanical noise samples for added realism.
Each of these engines contributes to the overall flexibility and depth of Orchid’s sound design.
14.2 Virtual Analog & FM Synth Structure
The Virtual Analog and FM Synthesizers share a flexible architecture featuring:
- 4 Oscillators per synth, providing rich sound sources with multiple waveforms
- 4 LFOs for modulation and creating dynamic movement
- 4 Envelope Generators for shaping amplitude, filter, and modulation over time
- Adjustable Filter Types for sound sculpting
While the synth engine parameters themselves are currently not editable by the user, the preset sounds loaded into Orchid have been meticulously programmed to maximize the sonic possibilities of all three synthesizers. Each preset in Orchid has been pre-configured using this structure, maximizing its sonic capabilities.
14.3 Sound Selection & Presets
- Presets are pre-designed to take full advantage of the synth engine’s capabilities.
- Orchid does not currently allow direct editing of synth parameters, but presets have been carefully crafted to offer a wide range of expressive sounds.
15. Troubleshooting & FAQs
If your Orchid isn’t functioning as expected, refer to the troubleshooting guide below to diagnose and resolve common issues.
15.1 Common Issues & Solutions
| Problem | Possible Cause | Solution |
|---|---|---|
| No sound output | Volume too low | Turn up the Volume Knob. |
| Chords sound sloppy or loose | Slop mode enabled | Check Performance Settings. |
| Orchid isn’t playing in tune | Key Mode or voicing issue / Transpose | Check Key Mode and Voicing Settings. Also check Transpose isn’t on. |
| Wrong chords being played | Key Mode altering accidentals | Exit Key Mode or change Key Settings. |
| Cannot save sound settings | Save function not used properly | The Save State Feature will be coming in an update soon. |
| Notes jump around octaves | Voicing Dial affecting placement | Adjust Voicing Dial or Single Notes Mode. |
| Bass notes not audible | Bass volume too low or incorrect mode | Increase Bass Volume and check Bass Menu. |
| Only bass notes playing | Bass mode settings incorrect | Check Bass Menu, ensure correct setting. |
| Unexpected creative bursts | Normal function of Orchid | The Orchid is working as intended! |
15.2 Frequently Asked Questions (FAQs)
Getting Started
Q: I have my Orchid. Where do I begin?
A: Charge your unit and update to the latest firmware to access the latest features. Then, start by playing a chord!
Q: Why isn’t my unit turning on?
A: Hold down the Power Button for 10 seconds. If that doesn’t work, visit the support page for instructions on rebooting the device.
Hardware
Q: Can it charge and play at the same time?
A: Yes, however charging and the use of USB MIDI is currently not possible.
Q: Was I meant to receive a charger in the box?
A: No. Orchid does not include a charger to reduce electronic waste. Any USB-C charger will work.
Q: How do I charge Orchid?
A: Use any USB-C charger or laptop charger.
Q: Can I connect Orchid with other hardware?
A: Yes. Orchid connects to:
- Audio Equipment via the 3.5mm line-out jack.
- MIDI Devices via the 5-pin MIDI-OUT jack.
- Computer/DAW via USB-C for MIDI communication.
Q: Why is the battery percentage inconsistent?
A: Battery estimation can affected by usage and temperature.
Q: Can I play a chord without using the Chord Extension buttons?
A: Yes, by pressing the Key Knob. When the Key LED is on, single-finger chords play in the selected key.
Software
Q: Can I create my own sounds on Orchid?
A: Not at this stage.
Q: Will new sounds be released?
A: Yes, via firmware updates.
Q: Why aren’t my sounds velocity sensitive?
A: Ensure Velocity Sensitivity is enabled in Options > Velocity Sense. Some sounds on Orchid have yet to have velocity assigned. This will be fixed in upcoming versions.
Q: Can I save recorded loops?
A: Not at this stage.
Q: Can Orchid send a MIDI clock signal?
A: Not at this stage.
Q: Can I change the speed of a recorded loop?
A: Yes. Turning the BPM Knob adjusts the loop’s tempo.
Q: How many tracks can I layer in Loop Mode?
A: Unlimited.
Q: How do I use the bass synth?
A: Long-press the Bass Dial to choose a mode, short-press to turn it Off / On.
Q: Why can’t I hear bass notes?
A: Increase Bass Volume by holding Volume and turning Bass Volume up.
Q: Why am I only hearing bass notes and not chords?
A: Long-press Bass to access the Bass Menu; you may have Bass Single Notes or Solo Mode selected.
Q: When I press an extension (6, m7, M7, 9), why don’t I hear a chord?
A: When Key Mode is OFF, you must press a Chord Type Button (Dim, Min, Maj, Sus) to define the chord structure, then use extensions in combination with the Chord Type.
Q: Why do the notes shift octaves unexpectedly?
A: The Voicing Dial affects octave placement. In Options > Single Notes, select Full Octave for minimal shifts, or Split Mode for broader exploration.
Support & Assistance
Q: How can I hard reboot my Orchid?
A: Hold down the Power Button for 10 seconds.
Q: Why do I hear a pop sound when shutting down?
A: A small discharge noise is normal on shutdown as the speakers power down.
15. Compliance & Safety
15.1 Regulatory Compliance
This product complies with the essential safety and electromagnetic compatibility standards required in various regions:
CE Compliance
This product complies with the essential requirements and other relevant provisions of EU Directive 2014/30/EU (EMC) and 2014/35/EU (Low Voltage).
FCC Compliance
This device complies with Part 15 of the FCC Rules. Operation is subject to the condition that this device does not cause harmful interference.
15.2 Battery & Charging
The Orchid contains a rechargeable lithium-ion battery. To ensure safe use and prolong battery life, follow these guidelines:
- Use any standard USB-C charger. For maximum efficiency, connect the Orchid to a wall socket.
- Orchid does not charge while in USB MIDI mode.
- Do not overcharge. Overcharging can shorten battery life and cause overheating.
- Do not puncture, disassemble, or damage the battery. If the battery swells, leaks, or emits an odor, discontinue use and contact support.
- Store in a cool, dry place. Avoid direct sunlight or moisture when storing for extended periods.
- Charge to 50% before long-term storage to maintain battery health.
15.3 Safety Warnings & Precautions
Electrical Hazard
Always disconnect Orchid from power before cleaning or performing maintenance.
Risk of Hearing Damage
Avoid listening at high volumes for extended periods to prevent potential hearing loss.
Do Not Water Your Orchid
Keep Orchid away from liquids to prevent electrical failure or damage.
Children's Safety
While Orchid is a great tool for learning music, it should only be used under supervision by children.
Heat Damage
Avoid prolonged exposure to extreme heat or direct sunlight, as this may cause battery overheating or failure.
16. Maintenance & Care
Proper maintenance ensures Orchid remains in optimal condition for years to come. Follow these care guidelines:
16.1 Cleaning
- Use a dry, lint-free cloth to clean the surface of the Orchid.
- Avoid using harsh chemicals, including pesticides or herbicides.
16.2 Storage
- Store the Orchid in a cool, dry place, away from direct sunlight and moisture.
- Whether it's on a studio shelf, next to other synths, or on the couch beside the remote (unlike your other synths), keep it safe from potential damage.
Note: If you're reading this in the distant future after finding an Orchid in an antique store – hello! We hope musical technology has evolved nicely since we designed this.
16.3 Software Updates
Orchid software is frequently updated to improve features and performance. Keep your Orchid up to date by:
- Checking email notifications or the online Patreon community.
- Visiting firmware.telepathicinstruments.com for the latest firmware.
- Plugging Orchid into your computer via USB-C and following the update instructions.